Viewer Frontend
The viewer frontend is visualized below. Useful keyboard shortcuts are shown.
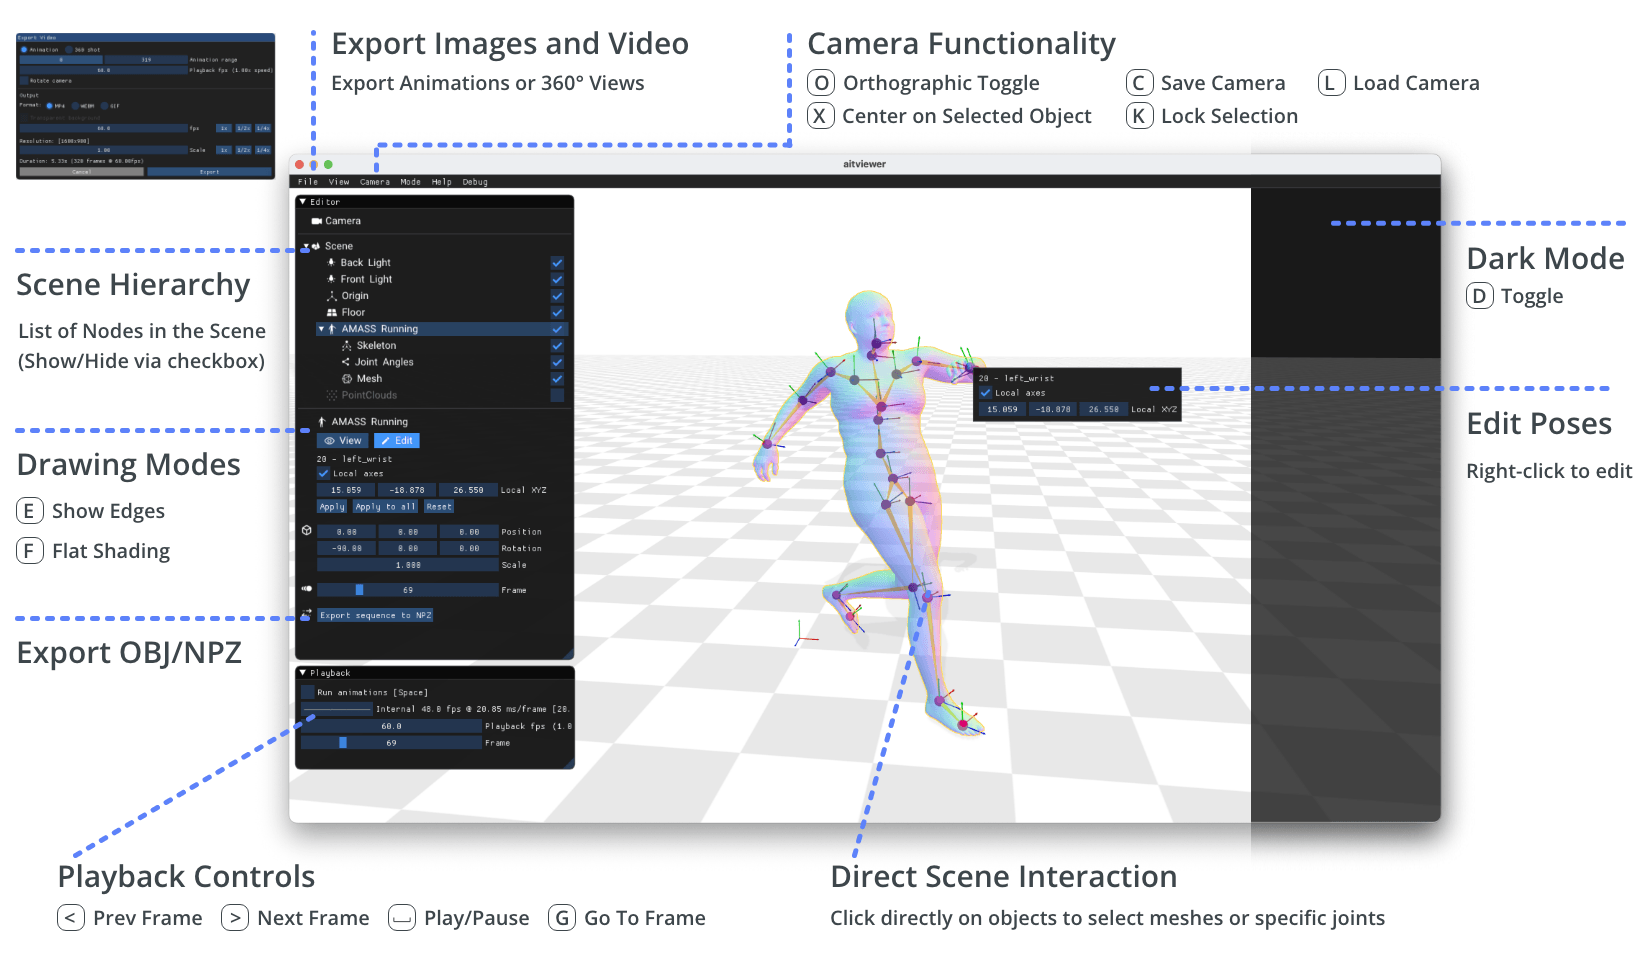
Using the Frontend
The basic functionality is illustrated - all sequence data can be played via the playback controls natively. The main drawing canvas is interactive - meaning that objects can be clicked on and selected (and in the case of SMPL - edited). We support a comprehensive video export dialog (File > Export) with custom animation framerates and optional 360 degree rotation.
Configure the Viewer
The viewer loads default configuration parameters from aitvconfig.yaml. There are three ways how to override these parameters:
- Create a file named
aitvconfig.yamland have the environment variableAITVRCpoint to it. Alternatively, you can pointAITVRCto the directory containingaitvconfig.yaml. - Create a file named
aitvconfig.yamlin your current working directory, i.e. from where you launch your python program. - Calling
C.update_conf()directly from a python script with a dictionary of option value pairs. This function should likely be called before creating any object to ensure that the new values are used.from aitviewer.configuration import CONFIG as C C.update_conf({"run_animations": True})
Note that the configuration files are loaded in this order, i.e. the config file in your working directory overrides all previous parameters.
The configuration management is using OmegaConf. You will probably want to override the following parameters at your convenience:
datasets.amass: where AMASS is stored if you want to load AMASS sequences.smplx_models: where SMPLX models are stored, preprocessed as required by thesmplxpackage.star_models: where the STAR model is stored if you want to use it.export_dir: where videos and other outputs are stored by default.
Full Set of Keyboard Shortcuts
The viewer supports the following keyboard shortcuts, all of this functionality is also accessible from the menus and windows in the GUI. This list can be shown directly in the viewer by clicking on the Help -> Keyboard shortcuts menu.
SPACEStart/stop playing animation..Go to next frame.,Go to previous frame.GOpen a window to change frame by typing the frame number.XCenter view on the selected object.OEnable/disable orthographic camera.TShow the camera target in the scene.CSave the camera position and orientation to disk.LLoad the camera position and orientation from disk.KLock the selection to the currently selected object.SShow/hide shadows.DEnabled/disable dark mode.PSave a screenshot to the theexport/screenshotsdirectory.IChange the viewer mode toinspect.VChange the viewer mode toview.EIf a mesh is selected, show the edges of the mesh.FIf a mesh is selected, switch between flat and smooth shading.ZShow a debug visualization of the object IDs.ESCExit the viewer.
Custom Viewer
You can create your own custom viewer by overriding the main Viewer() class. An example is included in the repo that shows how to interactively handle clicking on vertices of a mesh (For example, if you want to place markers, or identify nearby vertices manually).
vertex_clicking.py: An example how to subclass the basic Viewer class for custom interaction.